How To Backup and Update Your RetroPie Image
So, you have your retro gaming machine all setup and have been enjoying some awesome gaming for some months now. It may not surprise you to learn that, being the fantastic people that they are, the developers at RetroPie are constantly adding improvements to their amazing application.
The issue this creates however is that you downloaded and set up RetroPie a while ago now and are not able to experience all these impressive upgrades unless you update your application. So what improvements have you missed out on by not updating RetroPie to the latest version? Are you missing out of any new features that have been added since your initial build? Have there been any bug fixes that have managed to resolve any frustrating glitches? If so, how do you get hold of these new features? Would updating your software risk corrupting the build you worked for weeks on getting just the way you wanted? What about all the ROMs that you have painstakingly downloaded? You don’t want to risk losing any of those.
The way to ensure that there is no danger of losing any bespoke features that you may have added to your existing build (which will no doubt enable you to sleep soundly at night) would be to backup your RetroPie image before you attempt any updates. Here we will take you through the entire process of backing up and updating RetroPie from start to finish, so that you can enjoy the latest features that RetroPie has to offer, safe in the knowledge that if anything goes wrong you can always fallback to your previous, stable build.
How to Backup RetroPie on Windows
Backing up RetroPie through a Windows operating system is by far the easiest method so that’s the procedure we will be using in this instance.
As well as a Windows PC you will also need an SD card reader (there is probably one installed on your PC) and a disk imaging application such as Win32 Disk Imager which can be downloaded for free by clicking on the link. We will be using Win32 Disk Imager for this example.
This process can be performed on many versions of Windows including 7, 8 and 10 amoung others. If you have a Mac, unfortunately Win32 Disk Imager is not available on the iOS platform, however you can use the Disk Utility app, which is shipped with the macOS, and performs a similar task.
Step 1
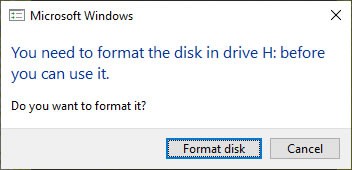
Take the SD card containing the RetroPie build that you want to backup and insert it into the SD card reader connected to your computer. At this point Windows may ask you if you want to format the SD card. This is because Windows does not recognise some of the files on your SD card (RetroPie is developed to run on a Linux machine, not Windows) and is therefore asking if you want to wipe the card. At this point under no circumstances should you format your SD card! Doing so will remove all files that currently reside on the card, and reverting back from this will not be possible.
Step 2
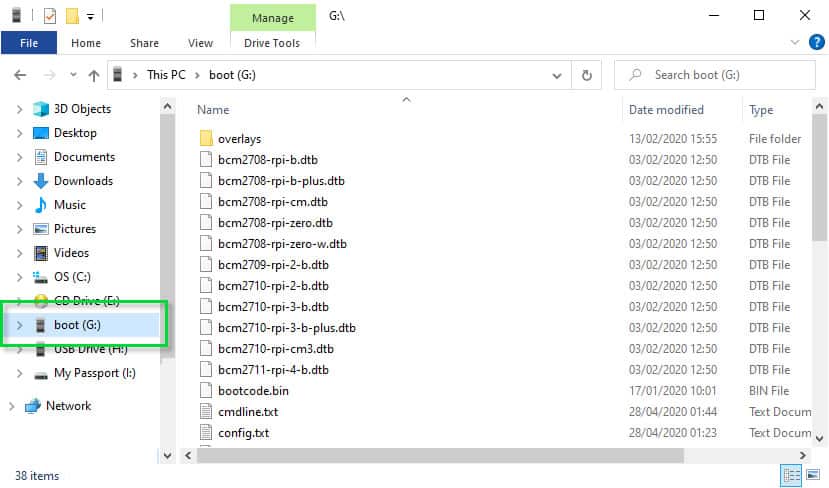
Using Windows Explorer navigate to your SD card which should be named boot. Make a note of the drive letter that the card is assigned to. You will need this in the next step.
Step 3
Startup Win32 Disk Imager and make sure the device dropdown on the right of the application matches the drive letter that your SD card is assigned to. In my case this is drive G:\.
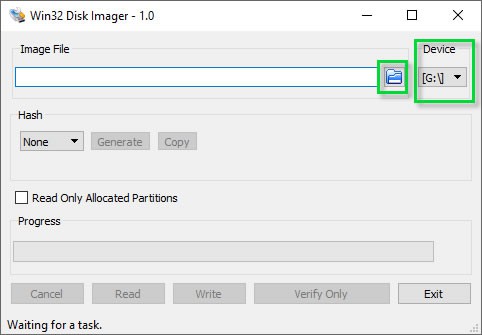
Next click on the blue folder icon on the right of the Image File section and select the location where you are going to store your backup. For simplicity’s sake I will choose my desktop but you can select any location you want. Once you have navigated to the desired location, give your backup file a name, for example ‘retropie-backup.img’ and click open to return to Win32 Disk Imager.
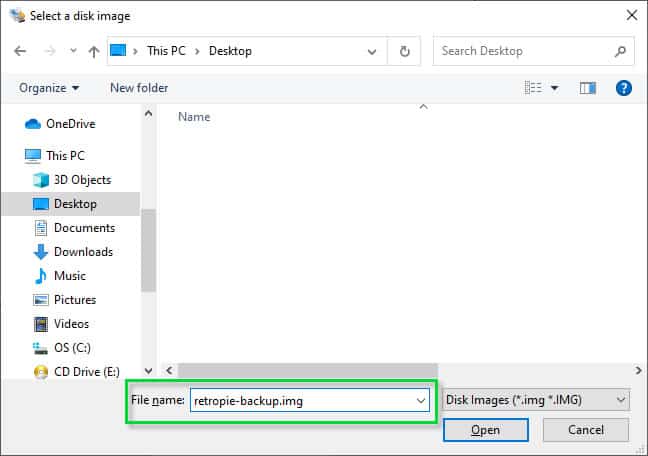
The process you are working through here will create an image file, which is essentially a replica of the contents of whatever media you are copying from.
When naming your image file, as you do in the step above, it is good practice to append the file name with the .img extension. This is not absolutely necessary as your PC will recognise what type of file it is regardless of whether you have added the extension or not. I would however recommend it as it makes it easier for you to identify the type of file it is – that is an image of your RetroPie SD card.
Step 4
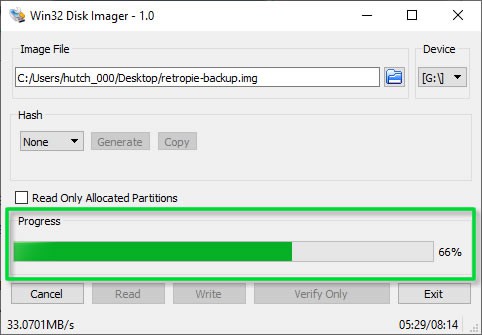
Now you are ready to create your backup image. Simply click on the Read button at the bottom of the app and Win32 Disk Imager will do the rest. You will notice a progress bar gradually filling up as the process completes. The amount of time this takes to complete can vary greatly depending on the size of your SD card, the number of files stored as well as a number of other factors. If you have a large number of ROMs the whole process could potentially take several hours. Perhaps you should go grab yourself a cuppa.
Step 5
Once the backup process has completed you will hopefully be presented with a ‘Read successful’ alert message from Win32 Disk Imager. This means that your backup has been created successfully and you can now sleep soundly knowing that your precious retro gaming build is safe and secure.
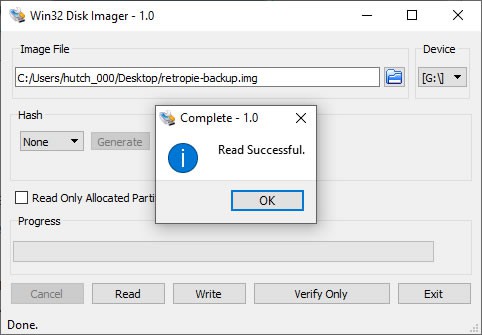
In the unlikely event that you see a ‘Read unsuccessful’ or ‘Read failed’ alert popping up and spoiling your day, I recommend that you give the backup process another attempt before losing faith.
Do You Need To Update RetroPie?
Well, the answer to this is basically no… but you should. Essentially if you have a working setup there is no need for you to update RetroPie. Your retro gaming system is fully functional, so if it ain’t broke why fix it, right? On the other hand subsequent updates to your version of RetroPie will possibly include bug fixes to certain issues that you may have experienced with your build, and will likely introduce additional features or upgrades to existing functionality.
Obviously an update is not necessary if you already have the latest version of RetroPie installed, but how do you know which version you have, and how can you find out what the latest version is? Read on to find the answer.
What Version of RetroPie Do I Have and How Do I Find Out the Latest Version?
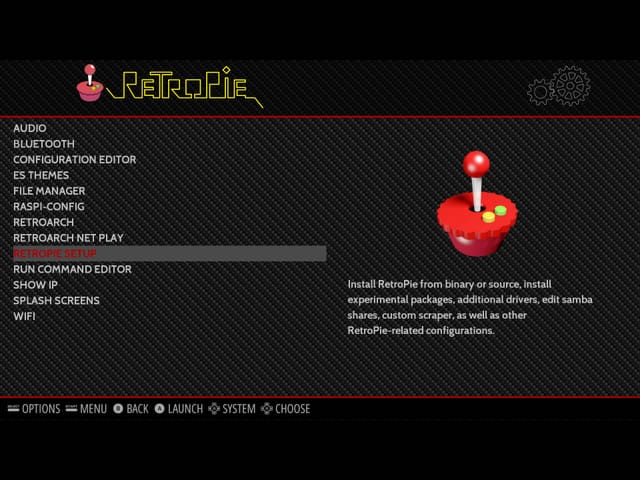
It’s easy to find out which version of RetroPie you currently have installed. Once you have booted up RetroPie go to the RetroPie configuration menu and select RetroPie Setup. This will take you through to a setup screen. To a novice this screen can look quite daunting but don’t worry, you won’t need to go any deeper into the options. The version of RetroPie you have installed is noted at the top of the window.
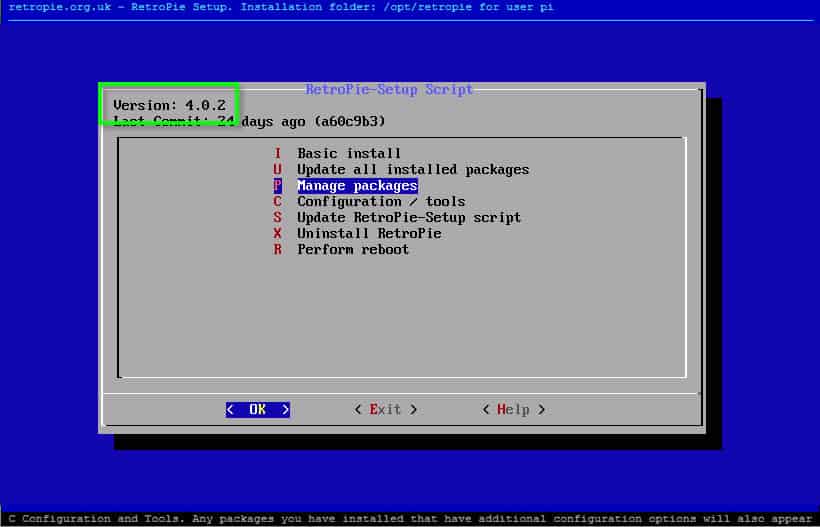
Finding out the latest version of RetroPie is also very simple. All you have to do is visit the official RetroPie website (the same site you will have visited when you originally downloaded and installed RetroPie for the first time). Here you will find a wealth of information related to RetroPie, including the latest version available and what changes have been made since the previous version.
It would serve you well to revisit the RetroPie website frequently. You may already have the latest version of the program installed, but this is not the only reason to pay the site a visit. News on up and coming updates, information on new hardware and an active forum are just some of many invaluable features available on this site.
How To Update RetroPie
There are a number of ways to update your version of RetroPie. I have found that the easiest way to do this is to use the setup script which can be accessed through the backend menu. Before you begin you will need to make sure that your Raspberry Pi is connected to the internet either by wi-fi or through an ethernet cable. Once you are all connected up you are ready to go ahead with your update.
It is not absolutely necessary to have a keyboard connected to complete this procedure, however I would recommend using one. It is possible to navigate around the RetroPie backend menus using a control pad however this is not the easiest tool to use and can lead to irritation and errors. Make life easier for yourself, use a keyboard to navigate around the menus.
Step 1
Start up RetroPie and go to the RetroPie configuration menu. Then scroll down to the RetroPie Setup option in order to enter the back end menu.
Step 2
You will now be in the RetroPie Setup Script menu. At this point it is easier to use your keyboard to navigate around the menu interface.
Scroll down to the Update RetroPie-Setup script option using the up and down arrow keys. Make sure OK is highlighted at the foot of the menu box. If it isn’t, use the left and right arrow keys to highlight it and press enter. You will then go through a series of prompts and alerts. Approve all of these and RetroPie will go ahead and fetch the latest setup script.
If it has been some time since you updated RetroPie you may find that your current version is quite out of date. If this is the case it may be possible that your current version of the Raspian operating system (the program that runs and manages RetroPie) is not compatible with the newest version of RetroPie. You will know this if you are presented with a number of error alerts after RetroPie has completed fetching the setup script
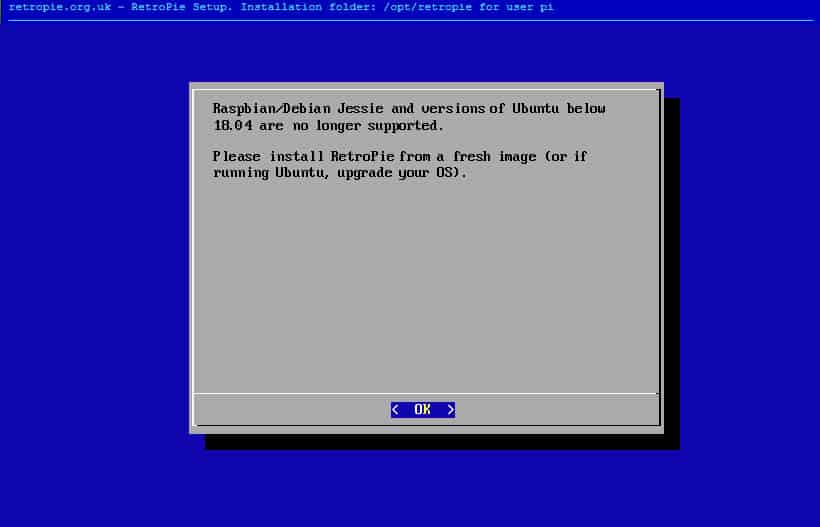
If you see this message it is recommended that you download and install a completely new version of RetroPie so that your operating system can also be updated. This may not be absolutely necessary at this stage however the longer you leave it the more likely it will be that you experience issues in the future.
Step 3
Once the system has completed fetching the latest setup script you will be returned to the RetroPie Setup Script menu. The next thing you need to do is run a basic install so that the up to date setup script can be executed. As you may have guessed this is done by selecting the Basic install option in the menu. Select Yes on the prompt and the install will begin.
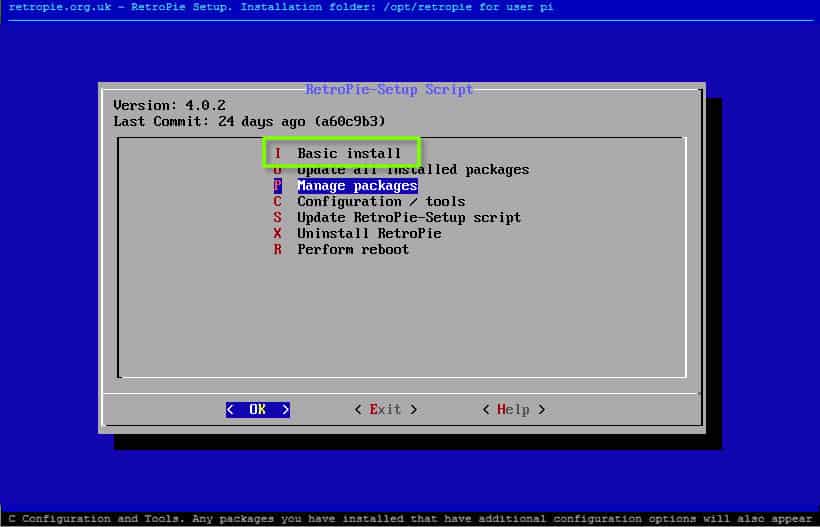
Once you have begun your update it can take some time for it to complete. My last update for example took over an hour. Also at times during the update it can appear that the process has frozen as the on screen code can remain the same for a long period. Give it time, perhaps even go and grab some lunch. You’re better off leaving the update to run its course rather than checking the screen every few minutes while at the same time getting ever more concerned that your update has failed.
Step 4
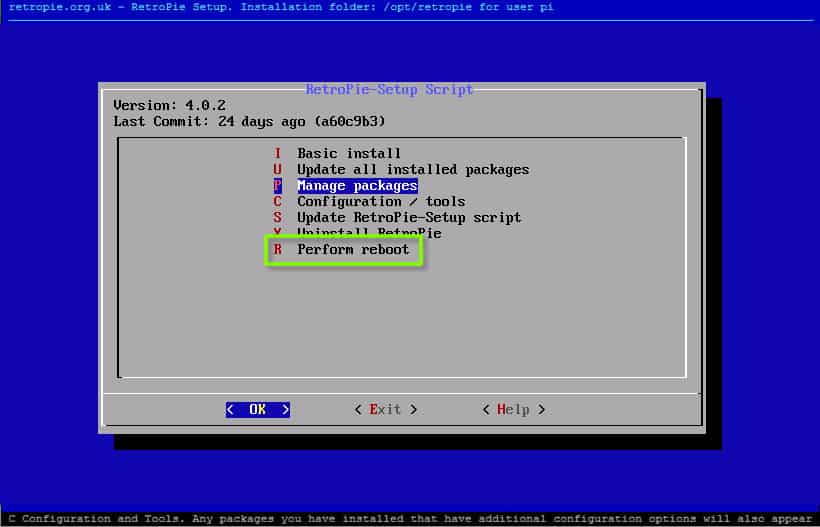
Once your install has completed you will again be returned to the RetroPie-Setup Script menu. That is basically all you need to do. Your version of RetroPie should now be fully up to date. The final step is for you to perform a reboot in order to load up the latest version. Select Perform reboot at the bottom of the list, select Yes when prompted and with any luck your updated version of RetroPie should load up along with all of your settings that you had configured from your previous version.
Why Has My RetroPie Update Failed?
Unfortunately it is not beyond the realms of possibility for your RetroPie update to fail in one way or another. The most likely scenario (other than your update actually succeeding) is that at the end of your update you are presented with a number of alerts detailing which packages have failed to install or update.
The reason most updates fail is simple – your version of RetroPie and Raspian are extremely out of date and are no longer compatible with the most recent version of RetroPie. If this is the case then you have 2 options. The first would be to perform a completely fresh download of RetroPie as you did when you first setup your retro gaming machine. This would mean that you lose all your themes, settings etc. however it would also mean that you will be completely up to date with both RetroPie and the Raspian operating system. The second option would be to revert back to your original version, which you definitely backed up earlier… Didn’t you?
The less likely form of a failed update is to see a complete failure in the form of either no change to your existing version or in a worst case scenario, a wiped SD card. In either case, if you are determined to update RetroPie, your only option (and the recommended option as you clearly have a suspect SD card) would be to get hold of a new SD card and perform a complete fresh install.
How to Reinstall Your Backup
Ok, so what happens if the worst comes to the worst and something goes wrong with your update, causing you to lose not only your perfectly configured settings, but also your invaluable collection of ROMs (as well as a whole host of other things you worked tirelessly to acquire and set up). However unlikely this eventuality is, it is certainly possible, but there is no need to worry because you followed the simple procedure outlined earlier in this article and backed up your image… Didn’t you? I’ll assume, yes 🙂
If this is the case then you can rest easy. All you need to do is use your backup image file to revert to your original setup. From there it is up to you whether you attempt an update again or simply play it safe and stick with what you have.
In order to reinstall your backup all you need to do is use Win32 Disk Imager again to write the image to another SD card. The steps to this are outlined below.
Step 1
Firstly, you need to find out the size of your backup image so that you know what size SD card you need. To do this right click on your backup file and select properties. The file size is listed in the General tab.
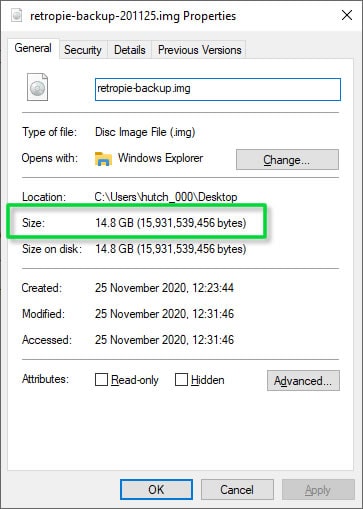
As you can see in the screenshot above the size of my backup is 14.8GB so I will need a 16GB SD card.
Step 2
Once you have the correct size SD card you are ready to write the backup image on to it. The process is similar to when you backed up your image earlier. Insert the blank SD card into the card reader and make a note of the drive letter it gets assigned to.
Step 3
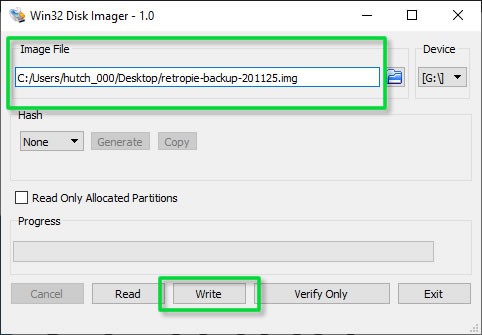
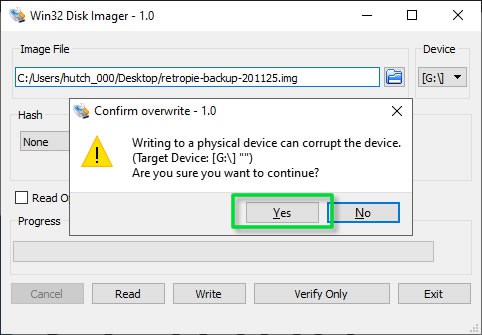
Using Win32 Disk Imager click on the blue folder and navigate to where your backup image is stored. Select the backup image and press open. The path to the backup image will then be shown in the Image File text box. From here make sure you have the correct drive letter selected in the Device dropdown list and then click the Write button at the bottom of the application. You will be presented with a warning box stating that writing to a device can corrupt it. Don’t worry too much about this. Corruption is always a risk when copying to physical devices, however it is generally a rare occurrence. Hit the yes button and Win32 Disk Imager will then go ahead and copy the image to your new SD card.
Step 4
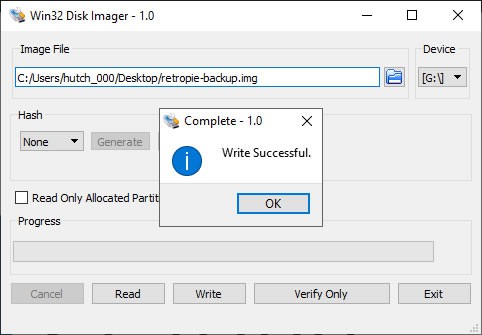
As the copying process progresses you will notice the progress bar filling up as it did when you backed up your old SD card. Once this has completed if all is successful you will be presented with the success notification. Your restore is now complete and you are free to go ahead and boot up RetroPie using your new SD card. And to think if you hadn’t backed up your image you could have lost everything!
One important note to make is that after you load up your newly installed backup, you will need to be using the same controller that you originally had programmed in. Otherwise RetroPie may detect the new controller and direct you to the controller setup wizard on startup.
Related Questions
Is it ok to skip version updates? It is absolutely no problem to do this. Just because an updated version has been released does not necessarily mean you need to install it. If you choose to skip a few updates you will simply acquire the features of those that you missed when you eventually do decide to install the latest update. One thing to keep in mind is that the more updates you skip, the longer any update you make is likely to take and the greater the possibility is that the current version of your operating system is no longer supported.
Will my setup stop working if I don’t update? No, as mentioned earlier it is not necessary to update. If you are happy to live life in ignorant bliss of the potential benefits that an update may offer, then who am I to judge.
Could an update break my machine? It is possible that your build will not function correctly after you update, however this is not likely to be as a result of the update itself. It is more probable that your SD card has become corrupted or that you need to update other mods on your machine that are not compatible with the new version of RetroPie.
